Friday, May 13, 2011

Use Paint to Create Unification in Picture Frame Groupings

Oh how I love Nate Berkus.  Plain and simple, he has some awesome ideas and tips.  That's why he has his own TV show.  Let’s talk frames.  Nate says the best way to create a wall grouping of frames is to make sure they all match in color.  

Now most of us probably have a bunch of miss-matched frames sitting in our house.  That is unless in your decorating prowess knew to buy the same colored frames.  I did not.  So while living in dorm rooms and apartments I had amassed a miss-matched collection of frames.  Just look at the below photo.  Had I known I would be starting a blog I would have remembered to snap a “before” photo.  Try to imagine all the frames in varying colors.


Enter Spray Paint.  By painting all of your frames to match you create a unified grouping - regardless of what is inside each one.  Sure you could go out and buy new frames, but this blog isn't about buying new.  It's about learning to re-use and not junking perfectly good stuff.

  
The process is simple.  Clean the frames to remove any dust.  Then, paint in a well ventilated area.  Thin coats is key!  Doing multiple thin coats looks a lot better than two thick ones.  In terms of which brand is best, I'm not loyal and typically go with the cheapest option at whichever store I'm at.  Krylon makes a good product and it's really cheap at Wal-Mart.
 

I skipped sanding and priming because frames aren’t generally in scenarios where they might get scratched and ruin the finish.  In terms of which finish to use, that is personal.  I typically like to use a more matte finish on frames, but when I worked on this project I had glossy can on hand thus saving me a trip to the store.

I left the large brown frame un-painted because it had writing on it and it was a wedding gift.  Sometimes you just have to break rules, especially when it’s your house.  At the end of the day, you have to love walking into your home or as Nate would say, “your house needs to rise up to you when you walk through the door.” 
 

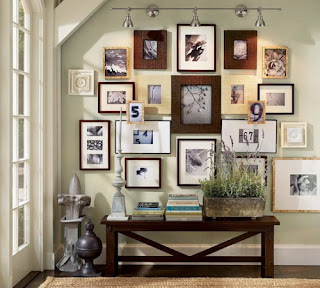
Don't get me wrong, you can still create a grouping of mis-matched frames such as this one from Pottery Barn:

If you notice, there is a theme of black, brown, white and cream frames dispersed throughout the grouping.  Since my frames didn't have a theme in color it made sense to paint them and create unification.  Below are some other examples of wall groupings done in one color.


Tuesday, May 10, 2011

Sand, Sand, Paint and MORE Painting

So you don't scroll to the bottom of this post, here's an "after" photo.  After I had finished my prep work, sanding was next.  Sanding isn’t rocket science although I doubt you’ll catch Paris Hilton anywhere near a sander.  I used Elmer's wood filler to first fill in some of the really bad scratches on the wood and screw holes that would not be replaced with hardware.  Once dried, I sanded everything with 100 grit sandpaper to remove the finish. 

Really wish I had thought about taking a photo at this point.  Anyway, I then inspected every inch of the dresser covering any scratch or ding with wood filler.  Any scratches you try to paint over will not be hidden which is why taking the time to cover any blemishes now is key.  Remember, I wanted these dressers to look brand new.  From this photo, you can see I still missed some nicks.  I think it adds character.  Plus, as you can see they are tiny and noticeable only in certain light.


After the second round of wood filler dried, I sanded again, this time with 220 grit paper.  Once again, I inspected everything just to make sure I didn’t miss any nicks or dings before I started painting.  Before you paint, make sure to wipe the wood clean – you don’t want any dust messing with the look of your finish!  I used an old rag and a dab of mineral spirits.

Up next…painting!  First I primed everything.  After waiting for the primer to dry I painted with Kilz antique white in an eggshell finish.  Not sure why I chose the eggshell finish but after the second coat of paint dried I could tell the finish would mark up easily.  Case in point, if you scratched a finger nail on the finish a black mark would appear. 

After some online research I decided to put a third coat of paint on and then put a final coat of clear semi-gloss polyurethane.  Why semi-gloss?  The egg shell finish just wasn’t doing it for me.  Much like watching the Chicago Bulls miss shot after shot in the 4th quarter of a play-off game. 

The directions on a can of polyurethane tell you to sand lightly between coats.  I didn’t do that.  Kind of like how Britney Spears was told to put on underwear before stepping out of the car in a short skirt.  I also didn’t put three coats on as the directions stated.  At this point I was tired of all the painting and sanding and decided to risk it.   

And you know what?  We’ve been living with these dressers in our house for two months and haven’t had any scratches.  My Dad explained it’s probably because I primed and put on three coats of paint before finishing it off with polyurethane.  Might the coat of polyurethane need to be replaced?  Perhaps after a significant period of time, but time will tell.  Here is the finished product of the second dresser:

 After reading this how to, does re-finishing a piece of wood furniture seem difficult? 

Run down of costs:
Two dressers:  Free
Primer:  Already owned
Paint Brushes/Roller:  Already owned
Antique White Paint:  $25
Polyurethane:  $5
Knobs and Pulls:  $47
Elmer’s Wood Filler:  $5
Grand Total:  $82

Not bad for two dressers.  An added bonus is I now have leftover wood filler, paint and polyurethane for future projects. 

Monday, May 9, 2011

Donate or Keep the Old "Baby" Furniture?

A while back my Mom called wanting to know if my husband and I would like two old dressers.  Not being one to turn anything FREE away, I of course say yes.  She quickly points out this furniture used to be my baby furniture and that it's beat up.  Who cares I tell her.  This will be the perfect chance for me to test out the new sander I got as a birthday gift (from my parents of course).  Below are “before” photos of both dressers.    I need to get better at taking “before” and “during” photos but I was so darn excited about this project because it was my first time refinishing ANY type of furniture.  I’m lucky I snapped these:

They certainly are dated, but nothing that can't be salvaged.  As a proud previous owner of this furniture I knew it had been well cared for and didn't have any major issues needing repair other than some nicks and dings. 

Dressers provide lots of uses other than the obvious one.  For example, the long dresser could be used as a buffet in a kitchen or even as an entertainment center.  The drawers provide lots of storage which is a bonus for things such as DVD's or dishes you pull out only at the holidays.  And of course you could always store clothing or linens.  There was no way I would let my parents donate these! 

The first step I took was to remove the hardware.  Since the hardware looked old and was always coming loose I needed to buy replacements.  Hardware isn't expensive if you only need a few knobs.  I needed 26 and so immediately looked online since websites such as www.amazon.com are typically a cheaper place to buy knobs, pulls and handles than box stores. 

If you look at the drawers on the bottom of each dresser, you'll see they have two handles on each side.  As a kid I always used to reach for the center.  Because of this, I decided to buy one pull for each bottom drawer and fill in the holes with wood filler where the old hardware used to be.  BONUS:  It saved me money!  Come back tomorrow for my tutorial for how I refinished these bad boys…

First Post!!

I decided to start this blog as a way to document furniture and accessory makeovers.  If I am able to motivate just one person to buy some paint and make something old fabulous again, then it is one item kept out of our landfills.  More power to you if you donate the items rather than just toss them to the curb!    

It seems too easy to toss out the old and buy new.  With a little elbow grease and know how I'm hoping to show it is relatively easy to makeover hand-me-down furniture from relatives, thrift store finds and even dumpster treasures.  I'm not an expert by any means and will be learning as I go.  All of my ideas, or at least most of them have probably been done by someone else before.  I hope you enjoy reading this and please offer your suggestions and comments with each post!